CEIVA Broadband Guide
Instructions for use with:
- CEIVA 2 Digital Photo Receiver™ (LF2003)
- CEIVA 3 Digital Photo Receiver™ (LF3000)
Set Up Your Broadband Connection
- Press and hold the white button on the back of the frame until you get to the Dial-in Control screen (third screen).
- Once on the dial in control screen let go of the white button and immediately tap the black button until the check box for Ethernet is selected. Once Ethernet is selected, let go of the black button and let the slideshow start again. diagram.
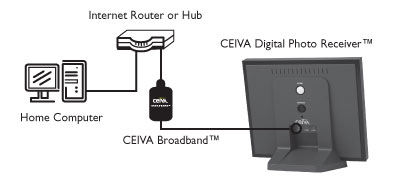
- Plug the USB connector side of your CEIVA Broadband adapter into your CEIVA frame's C-Port (diagram).
- Plug the Ethernet cable from your home network router into the CEIVA Broadband adapter (diagram).
- Plug the power back into your CEIVA frame and wait a few moments until the unit powers up. Verify that the link indicator light on the CEIVA broadband adapter is flashing amber (diagram). You are now ready to receive new pictures!
Connecting to Receive New Pictures
- Press and hold the white button on the CEIVA frame until the text on the screen reads "You can let go now, I'm dialing in."
- Wait for the "Congratulations" screen to appear on your frame and your connection is completed.
*If you are using static addressing you will need a USB keyboard or USB keyboard adapter to complete the CEIVA Network Configuration Screen. USB keyboard and USB adapter sold separately
ePlease visit help.ceiva.com for additional information.