CEIVA Wireless Guide
Instructions for use with:
- CEIVA 2 Digital Photo Receiver™ (LF2003)
- CEIVA 3 Digital Photo Receiver™ (LF3000)
Please note the wireless setup process for the Secure, Unsecured, and Online setups are for CEIVAs on software version 309. If your CEIVA is not on software version 309, please click here for instructions on how to upgrade.
Things to Know Before You Begin
In order to connect your CEIVA frame and CEIVA wireless adapter to your wireless internet connection, please make sure you have all of the wireless network settings listed below. If you are unsure how to access your network settings, please contact your wireless router company and they will be able to show you how to access your wireless network. The network settings must be entered into your CEIVA frame exactly how they appear in your wireless network or your frame will not connect.
- Network Name/SSID
- Network Authentication
- Data Encryption
- Network Key type (ASCII or HEX)
- Network Key
Set Up Your Wireless Connection
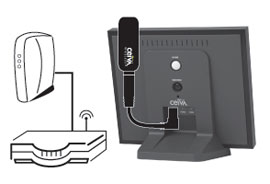
- Plug the USB connector side of your CEIVA Wireless adapter cable into your CEIVA frameâs C-Port.
- Plug the CEIVA Wireless adapter into the cable.
- Plug the power into your CEIVA frame and wait a few moments until the unit powers up.
Installation for Unsecured Home Networks
- Press and hold the white button on the back of the CEIVA frame. Continue holding it past the Slide Show and Dial In messages until you see the Dialing Prefix screen and then release the white button.
- Press and tap the black button on the back of the frame until the check box for Wireless is selected (diagram).
- Plug your USB keyboard into your CEIVA frame's C-Port (diagram). If you do not have a USB Keyboard see the "Online Setup" section below.
- Wait for the CEIVA Network Configuration Screen. Use the Tab key to navigate between the fields.
- Use the Space Bar on your keyboard to choose Wireless.
- Press the Tab key until you get to the Network Name field. Enter the Network Name (SSID is case sensitive) that you want your CEIVA frame to use. Press the Tab key.
- Enter the Network Authentication type (Open, Shared or WPA-PSK). Press the Tab key.
- Make sure that Save and Exit is chosen and press Enter to confirm changes.
- Plug the USB connector side of your CEIVA adapter cable into your CEIVA frame's C-Port (diagram).
- Plug the CEIVA Wireless adapter into the cable. Now you're ready to start receiving pictures.
- Press and hold the white button on the CEIVA frame until the text on the screen reads, "You can let go now, I'm dialing in."
- Wait for the progress bar to complete its progression on your frame to confirm that your connection is successful.
Installation for Secure Home Networks
- Press and hold the white button on the back of the CEIVA frame. Continue holding it past the Slide Show and Dial In messages until you see the Dialing Prefix screen and then release the white button.
- Press and tap the black button on the back of the frame until the check box for Wireless is selected (diagram).
- Plug your USB keyboard into your CEIVA frame's C-Port (diagram). If you do not have a USB Keyboard see the "Online Setup" section below.
- Wait for the CEIVA Network Configuration Screen. Use the Tab key to navigate between the fields.
- Use the Space Bar on your keyboard to choose Wireless.
- Press the Tab key until you get to the Network Name field. Enter the Network Name (SSID is case sensitive) that you want your CEIVA frame to use. Press the Tab key.
- Enter the Network Authentication type (Open, Shared or WPA-PSK). Press the Tab key.
- Choose your Data Encryption type. Press the Tab key.
- Enter the Network Key. Press the Tab key.
- Make sure that Save and Exit is chosen and press Enter to confirm changes.
- Plug the USB connector side of your CEIVA adapter cable into your CEIVA frame's C-Port (diagram).
- Plug the CEIVA Wireless adapter into the cable. Now you're ready to start receiving pictures.
- Press and hold the white button on the CEIVA frame until the text on the screen reads, "You can let go now, I'm dialing in."
- Wait for the progress bar to complete its progression on your frame to confirm that your connection is successful.
Online Setup
- Log in to your CEIVA.com account and go to your My Frames page. From your My Frames page, click on Frame Settings for that frame.
- Scroll to the bottom of the Frame Settings page to where it reads Advanced Wireless Settings. Click on "click to edit".
- Scroll down to the Wireless Network Settings section.
- Press the Tab key until you get to the Network Name field. Enter the Network Name (SSID is case sensitive) that you want your CEIVA frame to use. Press the Tab key.
- Enter the Network Authentication type (Open, Shared or WPA-PSK). Press the Tab key.
- Choose your Data Encryption type (if any).
- Enter the Network Key. Confirm the Network Key.
- Click on "Apply".
- Next you need to dial-in your frame to receive the new settings. Connect your frame to an analog phone line and press and hold the white button on the CEIVA frame until the text on the screen reads, "You can let go now, I'm dialing in." (This call allows your frame to contact the CEIVA Network and pick up your wireless settings.)
- Now that your frame has your Wireless settings, you will need to enable your receiver to dial in via wireless.
- Plug the USB connector side of your CEIVA adapter cable into your CEIVA frame's C-Port (diagram).
- Plug the CEIVA Wireless adapter into the opposite end of the CEIVA cable.
- Press and hold the white button on the back of the CEIVA frame. Continue holding it past the Slide Show and Dial In message until you see the Dialing Prefix screen and then release the white button.
- Press and tap the black button on the back of the frame until the check box for Wireless is selected (diagram).
- Press and hold the white button on the CEIVA frame until the text on the screen reads, "You can let go now, I'm dialing in."
- Wait for the progress bar to complete its progression on your frame to confirm that your connection is successful.
Troubleshooting
If you experience one of the following errors with your wireless connection, check Line 16 of your CEIVA frameâs Error screen for a message. To view the Error screen, scroll through your slideshow by pressing the Next or Right button until you reach that slide.
- The frame tries to connect but returns the error âWireless Connect Failureâ
Message: WL AP Timeout
The frame is able to access your access point/router but is unable to authenticate. Go to the wireless settings screen and verify the Network Authentication, Data Encryption, and Network Key are set properly. - The frame tries to connect but returns the error âWireless Not Availableâ
Message: WL AP SSID
The frame is unable to connect to your access point/router. Verify your access point/router is configured and working properly. You should also go to the wireless settings screen and verify the Network Authentication, Data Encryption, and Network Key are set properly. - The frame tries to connect but returns the error âConfiguration Problemâ
Message: NET DNS Ping
The frame is able to access the network but is unable to access the DNS server. Go to the wireless settings screen and verify the Preferred DNS Server and alternate DNS server are set properly. In most cases, these settings should be left blank so that the frame can retrieve the proper information on each connection attempt from your access point/router using DHCP.
Message: NET DHCP Problem
The frame is able to access your access point/router but is unable to communicate with a DHCP server. In most cases, DHCP is enabled on the access point/router so verify that your access point/router is properly configured. If you do not want the frame to use DHCP, then the IP Address, Subnet Mask, Default Gateway, and DNS Servers must be entered manually on the wireless settings screen.
Please visit help.ceiva.com for additional information.