CEIVA Wireless Guide
Instructions for use with:
- CEIVAwifi™ (PRO408W)
- CEIVAshare™ (SHR508A)
- CEIVA Pro 80™ (PRO408A)
- CEIVAlife™ (LIF408A)
- CEIVA 7-Inch Digital Photo Frame™ (LF4007)
- CEIVA 8-Inch Digital Photo Frame™ (LF4008)
- CEIVA for Whirlpool Refrigerators with centralpark™ connection (LF-4008CP)
Things to Know Before You Begin
In order to connect your CEIVA frame and CEIVA wireless adapter to your wireless internet connection, please make sure you have all of the wireless network settings listed below. If you are unsure how to access your network settings, please contact your wireless router company and they will be able to show you how to access your wireless network. The network settings must be entered into your CEIVA frame exactly how they appear in your wireless network or your frame will not connect.
- Network Name/SSID
- Network Key
How to Connect
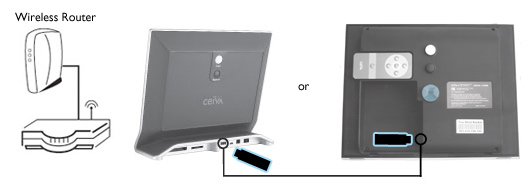
- Plug the CEIVA Wireless adapter directly into your CEIVA frameâs C-Port 1. Please Note: The CEIVA adapter cable is not required for use with the CEIVA LF4007 and LF4008.
- Plug the power into your CEIVA frame and wait a few moments until the unit powers up.
- Press the Menu button to activate Menu Mode. The Left and Right and Up and Down buttons allow you to make selections and move between different fields.
- From the main menu screen, choose Settings.
- From the Settings screen, choose Connection Settings.
- From the Connection Settings screen, choose How To Connect.
- From the How To Connect screen, choose Wireless and press the Select button. Press the Select button again to save your selection.
- From the Setup Wireless screen, choose Select Wireless Network. The frame will automatically scan for available networks and display them on the following screen.
- On the Select Wireless Network screen, use the Left and Right Arrow buttons to scroll through available networks. If you do not see your network in the list hit Refresh to scan again. Press the Select button to choose a network. Press the Select button again to save your selection.
- If your network does not require a key (password), you are finished. If your network requires a key, please enter it at this time via the on-screen keyboard. Selecting each letter is the same process as texting on a mobile phone keypad. Press the Select button twice to save your selection.
- Choose Exit to exit Menu Mode.
- Push and hold the white Picture button located on the back of your CEIVA until you see the message, âYou can let go now, Iâm dialing in.â Then, relax while your CEIVA connects to the CEIVA Network. A status screen will indicate the connection progress. Once completed, your CEIVA is ready to receive and display photosâautomatically!
If you have a static DNS, please use the directions below to connect.
- Choose Wireless Settings from the Connection Settings screen.
- From the Wireless Settings screen choose Edit Wireless DNS.
- Choose Auto DNS if you are using DHCP (leave this selected if you are not sure) and skip to step number 5.
- If not using DHCP, choose Static DNS to specify the DNS servers that will be used by the wireless adapter, and press the Select button. Select the Edit option next to Pref. DNS Server. Enter the IP address of the DNS Server, pressing the Select button after each character. Press the Select button when Save is highlighted to confirm your changes.
- Select the Edit option next to Alt. DNS Server. Enter IP address of the DNS Server, pressing the Select button after each. Press the Select button when Save is highlighted to confirm your changes.
- Press the Select button again when Save is highlighted to confirm all of your changes.
Troubleshooting
If you experience one of the following errors with your wireless connection, check Line 16 of your CEIVA frameâs Error screen for a message. To view the Error screen, scroll through your slideshow by pressing the "Next" button on the button tray until you reach that slide.
- The frame tries to connect but returns the error "Wireless Connect Failure"
Message: WL AP Timeout
The frame is able to access your access point/router but is unable to authenticate. Go to the wireless settings screen and verify the Network Authentication, Data Encryption, and Network Key are set properly. - The frame tries to connect but returns the error "Wireless Not Available"
Message: No USB
The frame is unable to detect the CEIVA Wireless adapter. Unplug the wireless adapter and plug it back in, verify the connection is snug.
Message: WL AP SSID
The frame is unable to connect to your access point/router. Verify your access point/router is configured and working properly. You should also go to the wireless settings screen and verify the Network Authentication, Data Encryption, and Network Key are set properly. - The frame tries to connect but returns the error "Configuration Problem"
Message: NET Setup Failure
The frame is unable to access the default gateway on your network. Go to the wireless settings screen and verify that the IP Address, Subnet Mask, and Default Gateway are set properly. In most cases, these settings should be left blank so that the frame can retrieve the proper information on each connection attempt from your access point/router using DHCP.
Message: NET DNS Ping
The frame is able to access the network but is unable to access the DNS server. Go to the wireless settings screen and verify the Preferred DNS Server and alternate DNS server are set properly. In most cases, these settings should be left blank so that the frame can retrieve the proper information on each connection attempt from your access point/router using DHCP.
Message: NET DHCP Problem
The frame is able to access your access point/router but is unable to communicate with a DHCP server. In most cases, DHCP is enabled on the access point/router so verify that your access point/router is properly configured. If you do not want the frame to use DHCP, then the IP Address, Subnet Mask, Default Gateway, and DNS Servers must be entered manually on the wireless settings screen.
Please visit help.ceiva.com for additional information.